I got hooked on plastic model kits in the fifties with the very first Airfix kits, followed by Frog and others. After great enthusiasm in the seventies, I got completely bogged down spending my time researching what to make and how to make it but not actually completing anything. I hope that has now changed — I’ve managed to drag myself away from the computer long enough to set up a dedicated workshop space in a garden shed, and I intend to use it to complete a good many models (1/48 and 1/32 scale). Maybe even post build logs here …
Once upon a time, (well, the 70s to be precise), not long after a group of us in the Hutt Valley had formed the Wellington branch of IPMS (the International Plastic Modellers Society), we were approached by Malcolm Laird. He had the idea of setting up a business producing vacuum-moulded model kits, which he called Falcon Models. We supported him as much as we could by providing information and other assistance, but really we just watched in awe. To establish what market he should aim for, he first tried out various aircraft subjects that took his fancy. A 1/48 B.E.2c wasn’t a good seller, and neither was the 1/32 Fokker D.VIII, so that was the end of World War One kits.
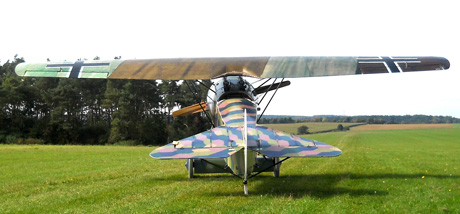
But I liked the Fokker. I wanted to build it, but the problem was how to represent the ‘lozenge’ fabric (Flugzeugstoff). I toyed with the idea of painting it by hand or using a stencil, but then lost interest. Twenty years later, in the 90s, I got access to a colour laser printer. At this time the modelling section of The Aerodrome WW1 aviation forum was at its most interesting (see below), and I had copy of the Methuen colour book, so I used Photoshop to match the colours of the fabric. Eventually I produced some pretty good lozenge-pattern printouts on decal paper; good enough to spur me into seeing what I could do with the old D.VIII kit. It went very well, until I found just how hard it was to get information on the the cockpit interior, and then life generally just got in the way again, and I didn’t finish it. See how far I got:
Now it’s 2018, and a number of things have happened. I’ve retired, and (theoretically) have the time to get back to modelling. Also, Achim Engels has produced three superbly accurate replicas — his own is now in Australia, and two airframes were finished by TVAL at Hood Aerodrome. Now, there is plenty of information, and no excuses. And, to top it off, I managed to get hold of the MikroMir (ex-Avis) 1/32 kit (so I wouldn’t have to do so much scratch-building), as well the Aviattic lozenge decal sheets. What could hold me up now?
The first thing I didn’t like about the MikroMir kit was the tubular fuselage structure. It’s incomplete, rough and flimsy. It would need a lot of cleaning up to remove flash and sprue attachment points, and one bit had already broken off in the box. I didn’t fancy my chances of doing the work successfully, so I built a new framework out of plastic rod and stretched sprue.
The next thing was the plywood fairing that transitions the shape of the aircraft from the round rotary engine to the square fuselage: it was moulded as if it were part of the fuselage steel-tube structure. In fact it was a plywood triangle framed with wooden strips. Easy enough to fix.
Next — I sprayed the frame in the appropriate Fokker colour (well, Tamiya XF76 anyway) and wrapped the longerons in strips of lozenge fabric decal (I need to do the bottom ones yet). The screen behind the pilot is thin plastic card with an attempt at representing at least some of the cord lacing with sewing thread run through beeswax. It’s a bit overscale, but using wire or paint just didn’t look right. I’ll even it up and tone it down a bit, but you won’t see much anyway with the seat in place. The double bracing wire is done with nylon monofilament given a metallic finish with a silver Sharpie. The floor is plastic card with a wood decal; the heel plates are aluminium foil rubbed over a suitably texture surface and the guides cut from card with a circle cutter.
Hey — no kit parts used yet!
I’ve only got so much time for modelling, and I’m not making much headway. I’m beginning to prioritise kits that look like they’ll be a straightforward build, and put aside those that I would once have enjoyed as a difficult challenge.
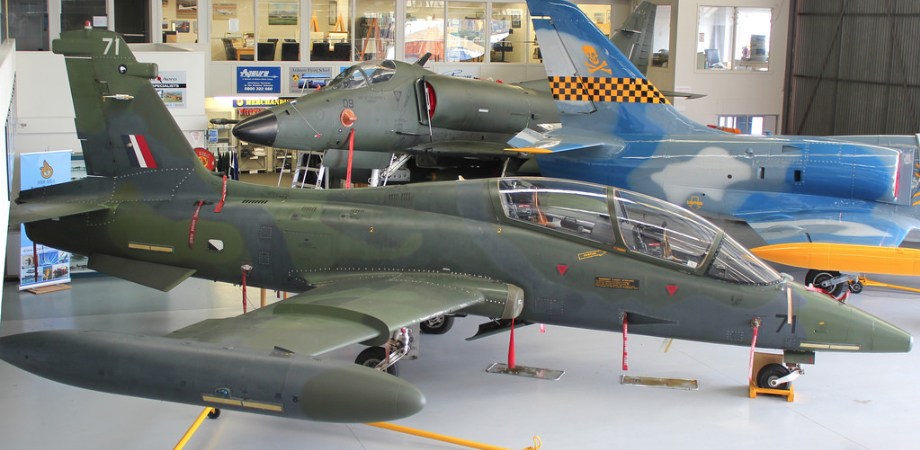
There a couple of kits in particular that I would really liked to have had a go at, but they share a problem that requires a time-consuming fix. Specifically, they are the Frems kit of the Aeromacchi 339 trainer, and the Isracast kit of its replacement, the T-6 Texan II. And the problem? Greatly exaggerated surface detail. Worthy in fact of the notorious Matchbox trench digger of a bygone era. I really don’t know why either of them are done that way. It might be technical limitations, or it might be just a effort to look complete and busy. Whatever — unless I’m happy to produce a model that looks like a toy (I’m not), it will all have to be filled in, probably with stretched sprue, and then sanded down and appropriate panel lines rescribed. To be honest, although the result would be worthwhile, it’s beginning to seem like too much hard work.
This is what I’m talking about:
And then there are the kits that I’ve decided won’t even make it to my stash. I’ve had a plan to grab every kit that will add to an RNZAF collection in 1/48 scale. There are two that have just been produced by the Chinese company Kittyhawk, the Bell Iroquois and the Kaman Super Seasprite. Both are good kits and accurate. The design of the Iroquois kit was overseen by Floyd Werner, who knows his helicopters. The Seasprite even has RNZN decals. But I won’t be buying either. Why? Because, like every other Chinese kit, they’re covered with an acne-rash of dimples that are intended to represent the mix of flush and round-headed rivets. Sorry, it just doesn’t do it for me. It looks wrong. And I can’t be bothered trying to fix it.
At last I’ve got a model in progress. I’m building the Wingnut Wings 1/32 postwar Bristol Fighter as 7122 of the New Zealand Permanent Air Force, and as always, construction has commenced with the cockpit.
Good as the kit is, I’ve made a few improvements. The rudder pedals and the support for the rudder bar are HGW photoetch. The wicker seat is a Barracuda resin; the kit seat is good, but the open part of the weave is not convincing (and I made a mess of trying to improve it). The resin replacement was actually too narrow, so I carefully Dremelled the seat pan away, and spread the back to fit around the seat cushion from the kit. The leather trim around the top was built up from a few layers of Mr Surfacer. The floor in the front was sprayed with a Tamiya acrylic base coat, then oil paint was brushed on and wiped off with a sponge to leave a woodgrain effect.
Although I’m pleased with the progress, it’s taken rather a long time to get this far. I feel that I can’t skimp, because the open cockpit is so visible. With the rigging to follow, there seems like a daunting journey still ahead. I might just decide to park this one for a while and turn to something that I have a better chance of finishing in a reasonable timescale. Perhaps I’ll continue the RNZAF theme, but switch to 1/48 scale. A PV-1 Ventura (Revell) or a Vampire (Alleycat) perhaps. [Or a Fokker D.VIII.]
There are two ways of buying the little bottles or tinlets of modelling paint. One used to be by mail order, until the postal authorities decided that a tightly sealed bottle containing a tablespoon of acrylic paint was far too dangerous to be sent by mail. There may still be sources, but so far I’ve only tried the major suppliers, without any luck. That leaves the other method — over the counter.
Last year my local model shop closed down, followed by a local toy shop that had stocked Tamiya and Humbrol. To buy paint I was left with the choice of an 168 km round trip north or a 126 km round trip south. That was until I discovered that the local Mitre 10 hardware store now had a rack of Humbrol enamels. And here’s where the other part of this tale of woe begins.
In my early days of modelling I used Humbrol enamel. It smelled a bit, but it’s all there was. I still have a stash of it acquired in the 60s and 70s. Despite its age, it’s still perfectly usable. Applied with a brush it covers well and dries to an even coat.
Last week I needed a colour I didn’t have, so I bought some at Mitre 10. The 14 mL tinlets are the same as they always used to be, which was encouraging. I stirred it thoroughly, and brushpainted some details. What a disaster! It would only brush in streaks and would obviously need more than one coat, it took two days to dry, and it dried gloss instead of the matt finish it was labelled as. I don’t know what changes have been made to the formulation, either to save money or in some way to protect me from harmful chemicals, but I’m not happy. In fact, I’m not sure where to go from here.
I got an “aeroplane book” for Christmas this year (good choice). Very nice, thoroughly researched and beautifully printed. It also made me realise how much better books are these days.
I’ve spent some of the past year culling my stash of reference material, which consisted of books and magazines going all the way back to the 50s (when Airfix kits cost half-a-crown), and it’s been quite a revelation to see the poor quality of much of what I had treasured. Looking through the older publications, the muddy and erratic printing is as bad as the musty smell that it has acquired. Printing technology has improved gradually but dramatically over the last half century. No more hot metal type or half-tone blocks.
Also noticeable is the use of colour. Printing in colour used to be prohibitively expensive and poor quality, and was rarely used. We assumed that old photos were always black white, because that was all we saw. But in fact the originals were often colour. During the war and earlier, a lot of publicity and propaganda material was shot on colour film — Agfacolor in Germany, Kodachrome and Technicolor among the Allies. It just didn't get into print that way.
New information keeps coming to light as well. Some of it is revealed when archives have been declassified, and some is found when old airmen have died and their families have been astute enough to recognise the importance of old diaries and photographs. The message is, don’t think that anything is the last word. You never know what may turn up.
The first kits I built were the first that Airfix produced, little sailing ships. I painted them with artist’s oil paints (all that was available), and they turned out pretty good. The brush strokes and the semi-matt finish on the sails in particular made them look real to my eyes.
When I turned to aircraft kits, the paint I used was an enamel available in small bottles in a limited range of mainly primary colours that had to be mixed. I was disappointed with the results, because the models looked like toys. Then I had a lightbulb moment: the problem was the gloss finish. So I bought some artist’s ‘eggshell’ varnish, and a coat of that made a world of difference.
Over the years modellers have had to contend with many attempts by manufacturers to add spurious detail so that the kits look ‘busy’. We’ve had rivets both raised (the size of soup bowls if scaled up) and recessed (like golfing divots), we’ve had trenches to represent panel lines that are hard to see on the real thing at arm’s length, and we’ve also had the representation of fabric surfaces by a coarse woven texture like sackcloth. In fact, real fabric surfaces are often hard to distinguish from painted metal without tapping them.
In the light of this, it’s odd that I should be contemplating the use of something as over-scale as a fabric-effect decal. The thing is, the range of fabric decal sheets from Aviattic has a fabric pattern so fine that the overall effect is more one of the subtle variation of colour and texture that you can see on a full-size aircraft. I’m going to try it and see how it works out, perhaps changing the colour a little with the undercoat paint. At least it will help in deciding which of the many possible shades of PC10 to use.
It’s a sign of the times that everything I’ve been interested in has eventually gone digital one way or another. Photography, typography, publishing, literature, art, and so on. In modelling, I used to read a lot of magazines and collect reference material; I do most of that online these days. But what about the models themselves?
The moulds for injection moulding have been cut from computer files for some time. Manufacturers of resin kits these days produce masters by rapid prototyping (3D printing). Now the final step — the direct production of 3D-printed after-market parts.
The first company I know of to do this has the unusual name of Gaspatch, and is based in an unexpected country: Greece. They specialise in parts for World War 1 models, and they have an impressive range of machine guns, turnbuckles and suchlike. Marvel at the perforations in the cooling jacket of this Spandau and even the gear teeth on the cocking mechanism. All basically in two parts (the barrel is separate) plus a padded butt and an ammunition belt.
No more fiddling with assembling tiny photo-etched parts or putting up with the limitations of injection moulding.
I’m impressed, really impressed.
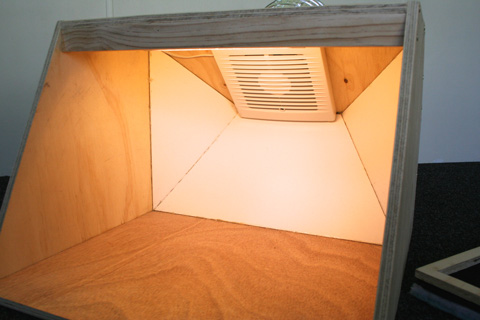
Progress! I finished something! But not a model, a spraybooth. Now I can spray indoors without ruining my health and filling the place with fumes.
As a result of lining my new workshop with plywood, I had a number of offcuts and a need to do something useful with them, so I made a spraybooth.
Here’s what it’s made of: 12mm plywood, an LED striplight, and a bathroom extractor fan and ducting (all from Mitre10), some cardboard (spare illustration board) and an overly expensive spraybooth filter (from Gordon Harris). Plus screws and glue. The design was just by eye, with the dimensions determined by the width of my plywood and the size of the extractor fan. One piece of plywood is cut as a frame for the filter and is just a push fit in place. Three pieces of cardboard are cut as baffles to direct the airflow to the fan, and just glued in place. The ducting was intended to go through the wall, but in order to keep it simple I’ll probably hang it out the window instead. The light is wired to the fan, so there’s only one switch.
I get stuck on things. One common reason that projects come to a halt is that I can’t work out some detail of the colour scheme. There were colour photographs in World War II (even in World War I, surprisingly) but rarely anything that helps. Which means I have to rely on interpretation of black & white photos.
It’s easy to be misled. Colour photos found on the internet are often colorised — someone’s guess as to the colour — and it’s hard to tell. Published profiles look definitive but suffer from the same problem. So do available decal sheets, where the artist has had to use second-hand information (I’ve drawn a few myself and know the problem). Official painting instructions were often ignored in the heat of battle; eyewitness reports are often confusing.
Here’s one example of many: the plywood parasol wing of the Fokker D.VIII (or E.V), the ultimate Fokker fighter of the Great War. For ninety-odd years it was received wisdom that the wing was painted a dark olive green, the same coloured dope that Fokker used for the streaked camouflage on Dr.Is and early D.VIIs. Then the late Dan San Abbott, in the online forum ‘The Aerodrome’, floated the idea that perhaps the wing had actually been coloured with four colours of stain. He based this idea on three things: the discovery of factory documentation for the E.V paint schedule that listed four wood stains (Mocha Brown, Azure Blue, ‘Azin’ violet, and New True Green), a photograph of workmen in the Fokker factory posing with paint pots by a D.VIII wing, and the belief that he could see patches of light and dark on the wings in some photos. What followed was a discussion that got so vituperative that the whole modelling section of the site was eventually and permanently shut down.
However, there’s no doubt that the colour plans that were produced in the course of the discussion looked interesting. Based on them, Achim Engels finished his replica with colour patches, Ronny Bar (who draws the profiles for Wingnut Wings kits) did a lovely three-view, and Rowan Broadbent of Pheon Decals produced a conjectural scheme to be used with his E.V sheets. It seemed to catching on, and most of online builds of the MikroMir reissue of the 1/32 Avis kit have used various interpretations of the coloured-stain scheme.
But I’m not convinced, for three reasons. Firstly, every proposed scheme is completely different to every other scheme in both colour and pattern. That’s because they are all complete guesswork, and that makes me uneasy. Were some of the colours mixed? Were they all mixed? Who knows. Secondly, after Herr Engels threw down his tools in 2012 and gave away his aircraft, the E.V ended up with the Australian Vintage Aviation Society. When it arrived, some of the stains on the wing had faded almost completely away. Somehow that doesn’t seem right to me. And thirdly, I’ve looked carefully at every photo of an original D.VIII or E.V that I can find, and I just can’t see what Dan San Abbott saw. Nearly every photo shows a dark-coloured wing, pure and simple. In one, on page 24 of Windsock Datafile 25, there certainly seems to be a dark patch on the underside of the starboard wing. But then on the same page the same aircraft at the same time is shown from a different angle, and the patch is no longer there!
As I said, interpreting the colours in black & white photos can be very misleading.
There are some things in plastic aircraft kits that aren’t quite right, but just have to be that way in an injection-moulded kit. The plastic has a thickness that even in 1/32 scale can’t be as thin as the sheet of metal that it represents. In a WW1 model, for instance, any rotary engine looks stumpy. If it didn’t have shortened cylinders, it wouldn’t be able to fit in the plastic cowling. If you replace it with an accurate resin engine you will then have to Dremel the cowling to death or get a resin replacements for that as well.
Some inaccuracies are not necessary, but I presume exist to allow for the possibility of modelling an in-flight pose. Examples are the cut-out in the flap of Tamiya’s excellent 1/48 P-51D, or the step behind the leading edge flaps in nearly all Skyhawk kits. These are easy to fix (just fill them in) but it’s surprising how many modellers don’t bother or don’t notice.
However, there’s another category of artifacts that are only present if the kit designer chooses to have them that way. The plastic has to flow into the parts through attachment points. After the plastic sprue has cooled in the mould, ejection pins push it out of the mould. That’s why there are parts that can never be square; there must always be a very slight taper or the part would be hard to eject. What can be altered with good design is the position of the attachment points and the position of the ejection pins. When you first look at a kit in the box, it is fairly easy to spot a model that is going to create extra work. Attachment points on canopies that will be almost impossible to disguise or deep ejection pin marks in hard-to-reach places in interiors.
It’s a challenge, but to a true modeller the result is worth the effort. Never mind that most people won’t know the difference.
© 2023 Tony Pritchard